

 Maintenance Connection Everywhere (MCe) · EAM/CMMS manuals
TL;DR
This guide demonstrates how to use Report Request Values inside the Report module through both a simple walkthrough and a complete real-world example.
The simple example explains each step individually, making it easy to understand how Report Request Values are configured and used.
The complex example shows how these values are combined in an actual report to solve common business requirements, such as:
- Defaulting to the current date when no date is selected.
- Automatically using the logged-in user's assigned Repair Center when no Repair Center is specified.
- Changing the report results based on whether the logged-in user is a manager.
Although the complete example is more advanced, it reflects how Report Request Values are typically used in production reports. Seeing multiple request values work together will help you understand how to build reports that require user-specific defaults, permissions, and filtering.
A fully working .kdl report is included so you can either:
- Import the report and examine a complete implementation.
- Follow the guide step by step and compare your work with the finished report as you learn.
For a complete list of available Report Request Values, refer to the Report Request Values documentation.
Report Request Values
To learn more about the different values available refer to this
List of Useful User ValuesComplex Report
This example contains a complete Timesheet report that demonstrates how multiple Report Request Values can be used together in a real-world scenario.
The report is configured to:
- Use the current date when no date is selected.
- Default to the logged-in user's RepairCenterPK when no Repair Center is specified.
- Determine whether the logged-in user is a manager and adjust the returned Work Orders accordingly.
This example is intended to show how Report Request Values can be combined to build reports that automatically adapt to the current user, reducing the need for manual input while enforcing user-specific defaults and permissions.
A fully working .kdl file is included where you can Import the report to examine a complete implementation.
export_report_wots2_2026-06-11_13-54.kdlKDL info and installation instructions:
Installing a report .kdl file
There are several places you might get a report .kdl file from.
- Our documentation has report .kdl files that allow you to see 'the finished' product or some specific features discussed in the document.
- You might have saved a copy to your drive before making changes to make it easy to get back if your changes don't work
- You might have received it from our Support or Professional Services to answer a question or a written for you.
- Someone else on your team, or someone else that uses our MCe products may have saved one to share.
How to use a report .kdl file
There are two steps, one to export a report, the other to import.
Exporting:
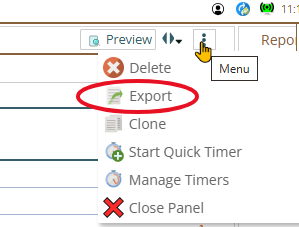
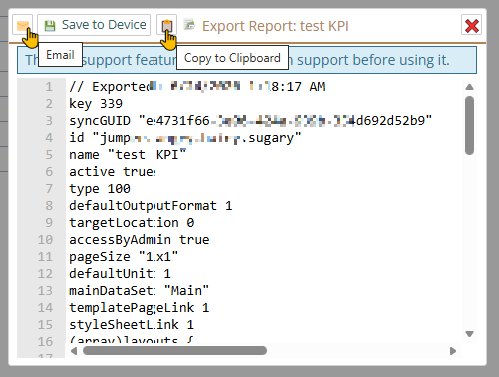
Exporting, you open up the report you want to export, then in the edit panel, choose the 3 dot menu and then choose export:
Importing:
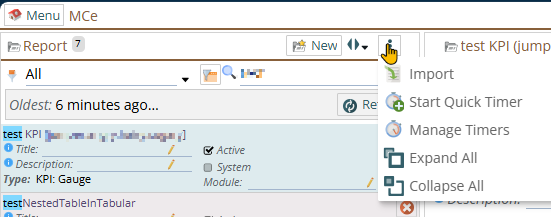
On the report definition module list panel, the 3 dot menu gives the option to import
Drag and drop the .kdl file you want to import, or click and the select the file from the Operating system file manager/picker.
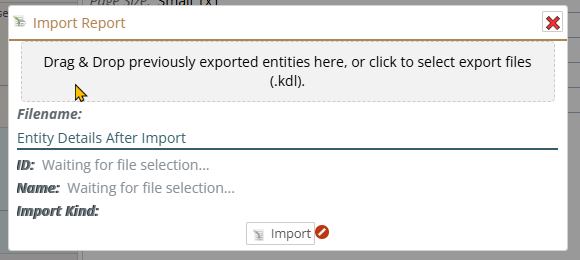
The view will vary depending on the type (Windows, Mac, Linux) the version, and any settings or software overrides you use. But they will all let you find a .kdl file to install.
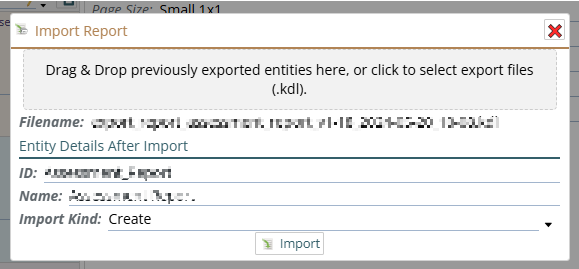
Depending on whether you have imported this specific file before you'll either get for the Import Kind option:
If this same file has already been imported, you'll get a choice of Update or Create as new.

If it hasn't you'll get a choice of Create or Create as New. It doesn't matter which of these two you pick.
What is a .kdl file?
You do NOT need to read anything that follows to use them! But if you are interested, sorry if it's mostly jargon:
The .kdl file extension, sounded as "Cuddle" is a modern, human-friendly document language designed for configuration files and data serialization, similar to JSON, YAML, or XML. In this context, KDL files feature a node-based syntax with XML-like semantics that resembles invoking CLI commands, supporting C-style comments, type annotations, and nested structures intended for readability and maintainability. But while we might occasionally go in and edit them by hand and we did frequently a decade ago, we almost always just use our tooling to edit them these days.
See more info on what a .kdl isSimple Report
This example demonstrates an intermediate implementation of Report Request Values. It focuses on the individual concepts and configuration steps, making it a good starting point before working through the more advanced reports.
Querying:
In this example we will be creating a simple report with the following features:
- The report would retrieve and display what Root Assets the user has access to
In this report we will be using the following Report Request Values:
1. ReportRequest.User.PK - this will be used to retrieve the LaborPK of the User
2. ReportRequest.User.RootAssetPKs - this will be used to retrieve the list of Root Assets the user has access to
Creating the Report
1. Create a new Report
2. Go to the Report module then Click the New Button
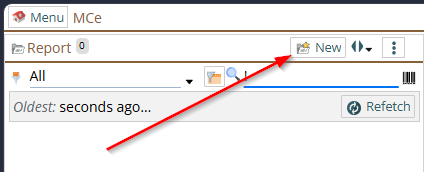
3. Configure the following fields:
| Field | Value |
|---|---|
| Type | Report |
| Report Type | Tabular |
| ID | <Enter Your Preferred ID> |
| Name | <Enter Your Preferred Name> |
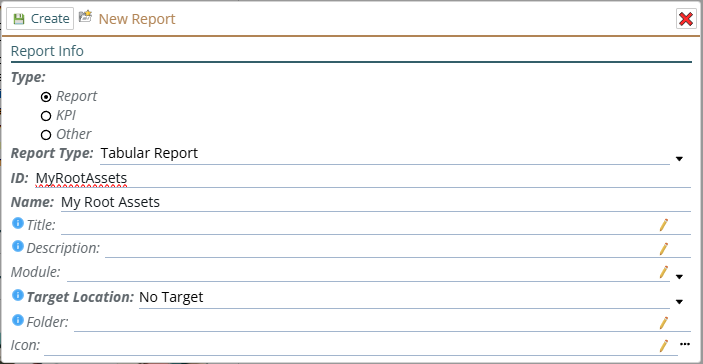
4. Click the Create button
5. Go to the Data Sets & Sources tab and add a new Data Source
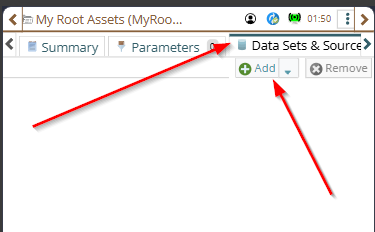
6. Go to the Values tab and add 2 new values with the following configurations:
| Field | Value |
|---|---|
| Name | RootAssetPK |
| Default Parameter | ReportRequest.User.RootAssetPKs |
| Multi-Select | Checked |
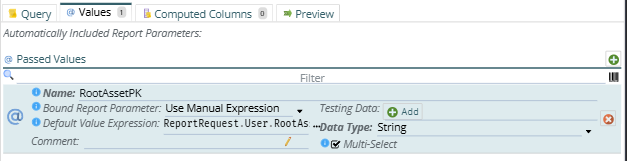
7. Go to the Query Tab and enter this query, this will retrieve all
SELECT
    AssetPK,
    AssetID,
    AssetName
FROM Asset
WHERE AssetPK IN @RootAssetPK
7. Once finished you can implement the layout and run the report.
Advanced Report
This example demonstrates an advanced implementation of Report Request Values. It uses a CTE (Common Table Expression) in the SQL query to demonstrate how Report Request Values can be incorporated into a more complex report.
Querying:
In this example we will be creating a more advanced report that has the following features:
- The report would retrieve the current logged in user's Work Orders and if the current logged in user is a manager retrieve all Work Orders in the same Access Group.
- The user can filter by Repair Center but if there are no values for filtering default to the assigned Repair Center of the logged in user
In this report we will be using the following Report Request Values:
1. ReportRequest.User.PK - this will be used to retrieve the data of the current logged in user
2. ReportRequest.User.AccessGroupPK - this will be used to determine if the logged in user is a manager or not.
3. ReportRequest.User.RepairCenterPK - this will be used as a default value if no value is selected for filtering
Create a new Report
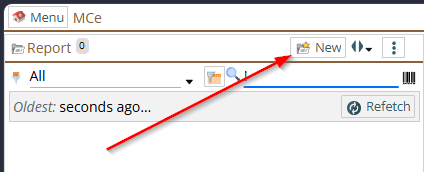
Go to the Report module
Click the New Button
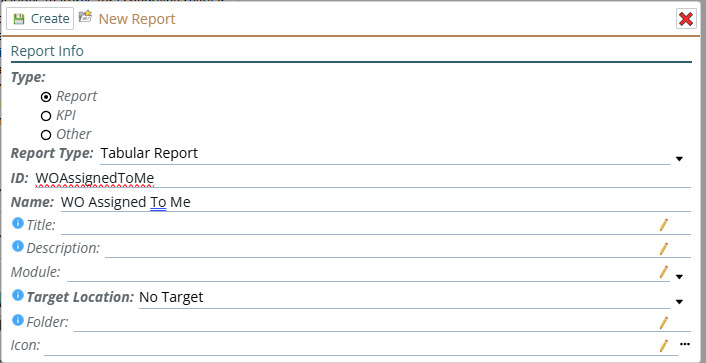
Configuring the following fields:
| Field | Value |
|---|---|
| Type | Report |
| Report Type | Tabular |
| ID | <Enter Your Preferred ID> |
| Name | <Enter Your Preferred Name> |
5. Click Create Button
Add the parameters
Configure the Parameters:
1. Go to the Parameter tab
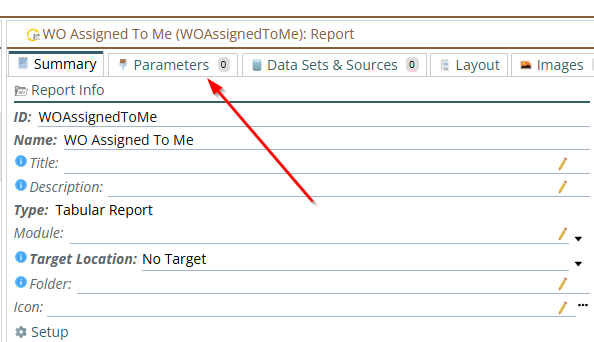
2. Click the add new parameter button
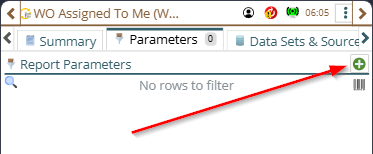
3. Configure the following fields:
| Fields | Values |
|---|---|
| Parameter Type | Static |
| Name | RepairCenterPK |
| Label | Repair Center |
| Type | Entity Picker |
| Picker | Repair Center |
| Field Type | PK |
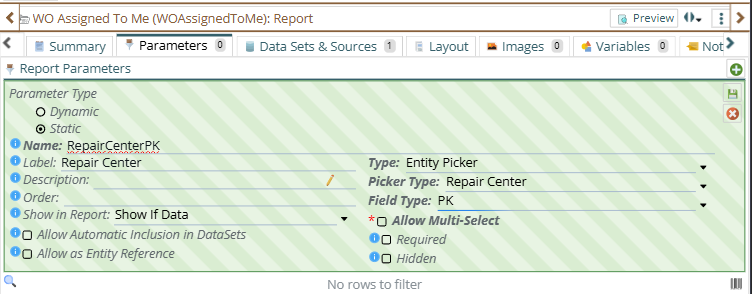
g. Save the parameter (note the green diagonal bars. The diagonal bars means it is not live yet, the green means it meets the rules to be allowed to be live. For those with color deficiencies, the save button also 'lights up', becomes brighter, when it is allowed to be live, as well, you should at least notice a visual brightening when it goes from grey to green.)
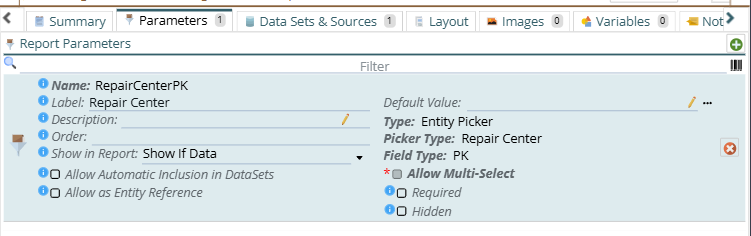
Configuring the Values
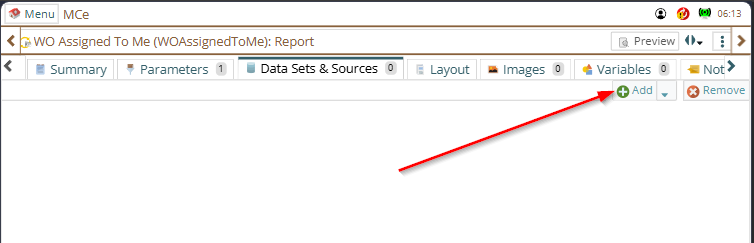
a. Go to the Data Set and Sources tab
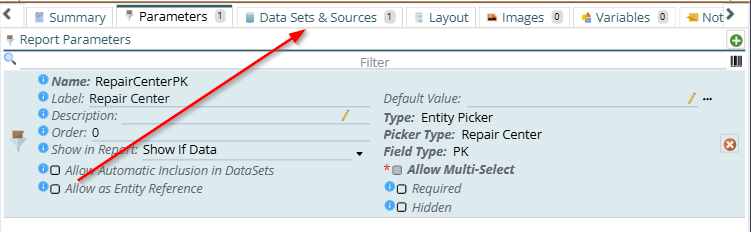
b. Click the Add button
c. Go to the Values tab
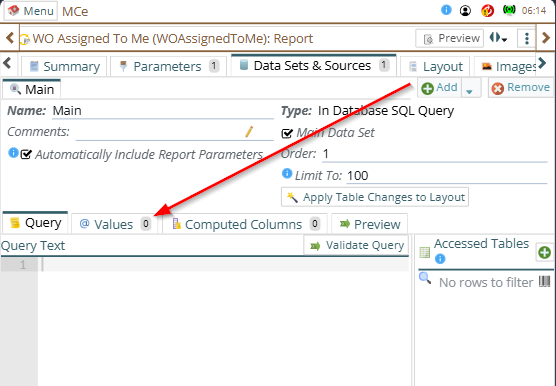
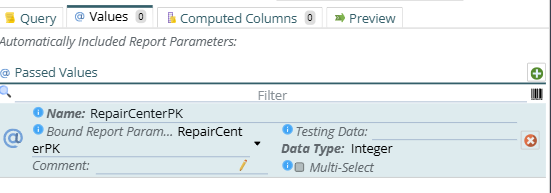
d. Configure the following Values
| Field | Value |
|---|---|
| Name | RepairCenterPK |
| Bound Parameter | RepairCenterPK |
2. MyRepairCenterPK - The currently logged in user's RepairCenterPK, this will be used as the default if no value is supplied by the RepairCenterPK parameter.
a. Name: MyRepairCenterPK
b. Default Value Expression: ReportRequest.User.RepairCenterPK

3. Me - The currently logged in user, this will be used as the default
a. Name: Me
b. Default Value Expression: ReportRequest.User.PK

4. MyAccessGroupPK - The current logged in user's Access Group, we will use this to determine if the logged-in user is a regular user or a manager in the example.
a. Name: MyAccessGroupPK
b. Default Value Expression: ReportRequest.User.AccessGroupPK

Adding the Query
1. Go back to the Query tab
2. Add a check if @RepairCenterPK has a value, otherwise go to default
IF @RepairCenterPK IS NULL
BEGIN
    SET @RepairCenterPK = @MyRepairCenterPK
END;
3. Next, using CTE we can check if the logged in user is a manager or not
WITH CheckManager AS(
-- Check if the logged in user is a manager
    SELECT TOP 1
        ag.AccessGroupPK,
        ag.RepairCenterPK,
        rc.SupervisorPK,
        CASE
            WHEN rc.SupervisorPK = @Me THEN 1
            ELSE 0
        END AS IsManager
    FROM AccessGroup ag
    JOIN RepairCenter rc
        ON rc.RepairCenterPK = ag.RepairCenterPK
    WHERE ag.AccessGroupPK = @MyAccessGroupPK
),
4. Next write the Query to retrieve the Work Orders
Main AS (SELECT
        WO.WOPK,
        WO.WOID,
        WO.Reason
    FROM WO
        JOIN WOLabor ON WO.WOPK = WOLabor.WOPK
        JOIN Labor ON Labor.LaborPK = WOLabor.LaborPK
),
5. Then Cross Join the CTE Checkmanager with the CTE Main
Main AS (SELECT
        WO.WOPK,
        WO.WOID,
        WO.Reason
    FROM WO
        JOIN WOLabor ON WO.WOPK = WOLabor.WOPK
        JOIN Labor ON Labor.LaborPK = WOLabor.LaborPK
        CROSS JOIN CheckManager cm -- CROS JOIN THE MANAGER CHECK

),
6. Then add the filter to check if the logged in user is a manager or not
Main AS (SELECT
    WOPK,
    WOID,
    Reason
  FROM WO
  CROSS JOIN CheckManager cm -- CROS JOIN THE MANAGER CHECK
  WHERE
  (
    cm.IsManager = 1
    OR (
        cm.IsManager = 0
        AND Labor.LaborPK = @Me
    )
  )
),
7. Retrieve the Main Data
SELECT
    WOPK,
    WOID,
    Reason
FROM Main
8. Once done it should look something like this
IF @RepairCenterPK IS NULL
BEGIN
    SET @RepairCenterPK = @MyRepairCenterPK
END;

WITH CheckManager AS(
-- Check if the logged in user is a manager
    SELECT TOP 1
        ag.AccessGroupPK,
        ag.RepairCenterPK,
        rc.SupervisorPK,
        CASE
            WHEN rc.SupervisorPK = @Me THEN 1
            ELSE 0
        END AS IsManager
    FROM AccessGroup ag
    JOIN RepairCenter rc
        ON rc.RepairCenterPK = ag.RepairCenterPK
    WHERE ag.AccessGroupPK = @MyAccessGroupPK
),

Main AS (SELECT
    WO.WOPK,
    WO.WOID,
    WO.Reason
    FROM WO
        JOIN WOLabor ON WO.WOPK = WOLabor.WOPK
        JOIN Labor ON Labor.LaborPK = WOLabor.LaborPK
        CROSS JOIN CheckManager cm -- CROS JOIN THE MANAGER CHECK
    WHERE
      (
        cm.IsManager = 1
        OR (
            cm.IsManager = 0
            AND Labor.LaborPK = @Me
        )
      )
)

SELECT
    WOPK,
    WOID,
    Reason
FROM Main
9. Once finished you can implement the layout and run the report.